How do I ...
Resources for Students
- Create a New Project and Bibliography
- Create Notecards
- Share Projects with Instructors & Classmates
- NoodleTools Quick Guide for Students
- Video Tutorials for Students
Resources for Instructors
- Teaching with NoodleTools: Instructional Strategies (Video, 21:27)
- NoodleTools Quick Guide for Instructors
Additional Resources:
- NoodleTools Help Desk (All tutorials)
- MLA Citation Guide (MCC Library)
- APA Citation Guide (MCC Library)
- Purdue OWL (Purdue University)
Get the Mobile App!
NoodleTools Companion - Free for PC students!

*You must set up your NoodleTools account before you can download the app.
Access NoodleTools from off campus
When off campus, click the NoodleTools link from the MCC Library website. You will be automatically prompted to login with your MEID.
What is NoodleTools?
 |
NoodleTools is more than a citation tool. It is a research-management system that can help you:
Visit NoodleTools' Product Overview. |
Get Started @ the MCC NoodleTools.com login
♦ New? Click REGISTER on the bottom left side of the screen and follow these steps:
 |
If you are off campus, the link will prompt you to log in with your MEID and password, just like any other database. |
♦ Returning? Simply SIGN IN with the username and password you selected. If it's been more than a year, you may be asked to REVALIDATE:
 |
Every August 1st, NoodleTools resets all accounts. If you are an MCC student or instructor:
|
|
Do you see the Projects screen? If this is what you are seeing ⇒⇒ Below find tips on how to use NoodleTools to create citations and manage your research. |
|

How to Create a New Project and Bibliography
1. On the Projects screen, click New project.

2. On the Create a New Project screen that pops up, enter a name for your project and select the appropriate citation style and level. Click Submit. NOTE: Once you create a project, you will be able to switch seamlessly between styles and levels. So what you set up now can be changed later with one click.

3. The Dashboard screen appears. The Dashboard organizes your work environment for effective research. You can see assignments, create to-do lists, submit work, and act on feedback from teachers in an organized way, and all in one place.


5. On the Sources screen, click New Source and select the best match for your source from the choices given. The selections under "What is it" is dependent on what you select for "Where is it?"


7. Click Continue to go to the next screen.
8. Fill in the citation form with information about your source. If your source is a book, you can locate the book in WorldCat (via an ISBN number or title/author search) and it will automatically fill in the form with the book's details, checked and revised for accuracy by NoodleTools.

How to Create Notecards
1. Click Notecards in the navigation bar at top.
2. On the Notecard Tabletop, click New.

3. Input notes about your source.


TIP: Once you've created multiple notecards, you can pile them. Drag a notecard and drop it on another notecard to create a new pile, or use the Manage pile option above the tabletop to manage existing and create new piles with selected notecards. Notecard piles become the basis of organization within the Outline panel next to the Notecard Tabletop.
Share Projects with Instructors & Classmates
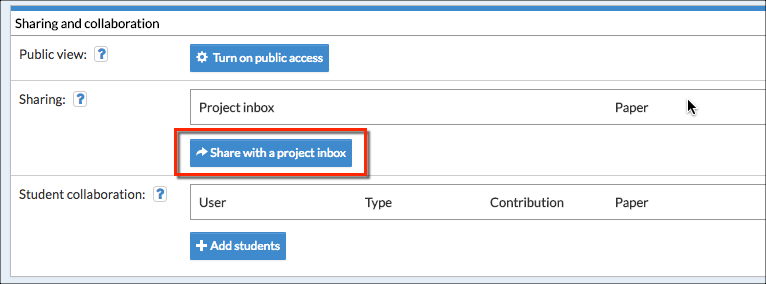
2. In the Project inbox field, enter the name of the inbox (as provided by your teacher). When the first letter of the inbox’s name is entered, a drop-down menu will appear and the name of the drop box can be selected.

3. Enter your name so that your teacher can identify you (if not clear from your username).
5. Click Done.
6. On the Dashboard screen you will now see the inbox’s name under Project inbox.

How to set up a project collaboration with your classmates
1. On the project's Dashboard screen, under Student Collaboration, click Add students.

2. In the field that opens up, enter the collaborator's Personal ID, Google ID, or Office 365 ID (i.e. the ID they use to log into NoodleTools). You can select Full collaborator if you wish to allow full add/edit/delete access, or Peer-reviewer if you want to share it as read-only (with just the ability to receive comments). If you need to add more collaborators, click Add more.


Print from NoodleTools
Use the "Print/Export" menu from the bibliography screen:
